https://vimeo.com/165461381
I interviewed Emily Wilson, a volunteer, about the Downtown aquarium. This interview was one of the easiest ones I’ve done so far. It was interesting to here what Emily has to say about the aquarium.
https://vimeo.com/165461381
I interviewed Emily Wilson, a volunteer, about the Downtown aquarium. This interview was one of the easiest ones I’ve done so far. It was interesting to here what Emily has to say about the aquarium.
The movie Spotlight was based on the priest scandal that took place in Boston in 2001. More then 150 priests were accused by more than 500 victims. The movie follows four investigative reporters from the Boston Globe who broke the story. The film followed the factual events as they occurred.
The film was well presented and the acting was very well performed. Mark Ruffalo and Micheal Keaton were phenomenal. Ruffalo demonstrated his character’s frustration when his character thought that his colleagues weren’t going to run the case. The reporters come together and make it their mission to prove that the Roman Catholic Church was sexually abusing young kids and covering it up.
It was exciting and nerve racking to follow these reporters on their quest to uncover the truth. The roller coaster ride of challenges and successes kept the viewers engaged and wanting to find out what happens. The reporters conducted in person interviews and over the phone with some of the victims and some of the priests. Most of the victims were willing to share but most of the priests were not willing. Their interview techniques were taking notes and writing things down whereas nowadays, most reporters take notes as well as record the interviewees. As technology continues to flourish, journalism in general seems to be getting a lot easier with reporting and taking notes and interviewing sources.
Investigative journalism is very interesting and entertaining to read/watch. Not everyone will be on the journalist’s side, although some people will be. This is shown in the film when Sacha Pfeiffer goes to one of the priest’s house and the priest is willing to answer her questions, the audience feels like we are getting somewhere and that the reporter might be on the verge of ‘cracking the case’. Then in the middle of the interview, the priest’s sister comes out and slams the door in her face and says, ‘get off my property’. As you can see from this, investigative journalism can also be very tricky and dangerous, but when the story comes together it is hard hitting news.
The work took a lot out of the characters. Coming across a story like that one is a once in a lifetime oppertunity. When you think about the church, or any church in general, tou tend to think about Sunday morning prayer and singing and peace. After seeing Spotlight and what happened at the church in this movie, it really opened my eyes to how scary reality really is.
After the film was released, a critic from the New York Times said, “Spotlight is a misrepresentation of how the Church dealt with sexual abuse cases”, asserting that the movie’s biggest flaw was its failure to portray psychologists who had assured Church officials that abusive priests could be safely returned to ministry after undergoing therapy treatments. Open Road Films rebutted the detractor, saying he was “perpetuating a myth in order to distract from real stories of abuse.”
When it comes to comments on articles and blogs, I am tied between two answers. On one hand, I think you should have comments on your blog/article because there are some people whose opinion is said in a helpful, constructive way that may help the company/blog/article grow. For example, Reddit and New York Times is usually pretty civil in their comment section. Reddit has a voting system voting on whether or not they think your comment is valid to the article or not. The New York Times moderates their comments. If they see an abusive or off topic comment, The New York Times will remove it.
But on the other hand, there are internet trolls who comment on sites such as Facebook and Yahoo saying rude and unhelpful things anonymously. There are also people who are paid by the government to try and argue against someone’s article/blog. Sometimes the comments go off topic and the original focus of the article is lost. Then people get more focused on what people are commenting rather than what the article is about.
On sites such as Yelp, there are people getting paid to write good reviews for certain companies. Yelp is trying to catch these fake ‘reviewers’ by putting an alert on their page. Because of the fake reviewers, consumers have been misled by Yelp. There have been advertisements on Craigslist soliciting people to write good fake reviews. For example, an appliance repair business said, “I’m willing to pay you $50 if you can write and post a review for my business.”
The method of using your personal Facebook account may not necessarily be the solution to the trolls commentary but it certainly will help. If someone comments an off topic comment or a rude, abusive comment on an article using their personal Facebook account, anyone who sees that comment can report and/or flag that person so they will no longer be able to comment on that site. Trolls comment mean and nasty things on blogs/articles because they are anonymous and think they can get away with it. Trolls would never say what they type in person. Trolls feel a sense of power when they get a reaction from their negative comment. We as a community should act like grown adults and ignore these negative comments.
Overall, my personal opinion is that we should have comments on articles/blogs because we can learn new things from the constructive comments and we can be adults and ignore/block the trolls and nasty comments. Hearing a readers constructive feedback about your article/blog can help you learn new ways of making your blog/article stronger and a better read.

Richard Smith is a Vocational Specialist and a tutor for College Living Experience here in Denver. College Living Experience is a program that helps young adults with learning disabilities be successful in their academic pursuits and learn to live on their own independently.
I sat down with Rick to discuss his life experiences and career in working with young adults.
What made you want to pursue a career in Vocational Rehabilitation?
Rick Smith was student teaching at a high school and he tended to go towards working with students with learning disabilities.
How did you end up working at CLE?
He ended up working at CLE after being referred by a friend.
What population of people do you prefer to work with?
Rick prefers to work with young adults under the age of 25 because they teach him news things he didn’t know before. They also end up teaching him new things about technology.
What is/was the hardest work you’ve had to do in this field?
He says the hardest work he’s had to do in this field of work was setting up conferences and projects.
How do you decide which approach is best for the client?
Rick tries to listen to the client and help them get past any barriers they may be struggling to get past.
How do you know when a client is progressing or regressing?
Rick knows that a student is progressing when they are exceling in their classes and he knows when they are regressing when they procrastinate and do not do their work.
What role do you think medication should play in treatment?
Rick thinks a holistic approach is preferred when treating a client. He thinks that medication is a key component to therapeutic rehabilitation, but also thinks there should also be traditional one on one talk therapy.
Which psychological disorder catches your interest the most? Why?
One of the most interesting mental disorders that he’s worked with is Borderline personality disorder. Because there wasn’t much treatment for the disorder in the past that was consistently effective, it proved to him that personality disorders are a challenge for many of the people who are living with them. Rick had a client who had a very interesting experience. She was borderline personality and she is the only one he knows of that has been cured of the disorder. She attempted suicide and during that time, she had a near-death experience. During that experience, she had to review her life and she said that review showed her how much of a horrible person she had been to other people. She contacted Rick and apologized to him for being such a horrible person to him as a client. She came out of this experience a changed person and when tested again, found out she no longer had a borderline personality disorder. This client went on to attend Denver University and studied psychology and is now a psychiatrist.
What do clients do that really annoy you? (That you can tell me)
Clients who procrastinate and don’t plan ahead really annoy Rick; especially if they try to make it his problem and do not take responsibility for it.
If a client starts having lots of problems between sessions, what are their options?
Rick says that the client’s first option should be to seek help wherever they need it. They can seek help from any of the staff members at CLE.
Overall, my experience with this interview was enlightening. I had a personal relationship with Rick before this interview and now I know more things I didn’t know about him. I learned many news things about Rick during this interview.
In this podcast, Giant Pool of Money, the producers of This American Life talked about the financial crash in 2008. In the prologue, they talked about two events. One was at the Ritz Carlton and the other was at a college in Brooklyn. At the first event, was an awards dinner for finance professionals-bankers, mortgage brokers, hedge fund managers-who were responsible for crashing the stock market. The other event, was for people facing foreclosure.
This introduction was effective because it grabs the readers attention right away by showing the listeners the difference between someone who caused the crisis and someone who was effected by the crisis. People who have lost their home might be listening to this and feel very angry. On the other hand, bankers and other finance professionals might be listening to this and feel good about it.
In act one, the producers talked about the origin of the giant pool of money and how it came to be. A giant pool of money is all the money in the world that is being saved at one time. For the listeners, it gives us a background and an understanding of the financial crash. This whole conversation could be confusing, so they break it down for us. They also talk about a man who borrowed money but eventually could not pay them back. The man did not have a job or income verification to pay the loan back but he got the loan anyway. It was a good idea to show a real person’s problem because it gave the listeners a visual of what they were going through.
The rest of the podcast was so confusing and I have no idea what they are talking about. I tried to understand the financial talk but I could not wrap my head around it.

Today I tried out this kind of coverup. It felt really pasty and didn’t match very well with my skin tone. Since it did not match my skin tone, I felt very self-consious wearing it and took it off almost immediately. I like coverup I just need to find the right kind. I will for sure be wearing some kind of coverup again soon.
If you want to know how to apply this product, here are some very helpful tips:
And that is how you apply coverup.

Today I tried a new brand of lipgloss/lipstick. I love the color and I would definitly wear it again. It did dry out my lips a bit, but overall it felt fine. It made my lips look bigger and brighter and fuller. It made me feel a bit better about my appearance and self worth. I got the lipgloss at King Soopers which I know is not the best place to get makeup. Maybe next time I will try and go to CVS and get better makeup.
If you want to know how to apply lipgloss, here are some great tips to start out with:
2. Exfoliate your lips, if necessary. Exfoliation is a process where the outer, dead layer of your skin is removed to give it a fresh look. Rough, cracked, or chapped lips can look less than appealing when you apply your lip gloss.
3. Moisturize your lips. Exfoliation can leave your lips feeling irritated. You should apply a moisturizer, like petroleum jelly or lip balm, to soothe any discomfort you feel. Applying lip gloss to dry, un-moisturized lips can cause the color to cling to dry patches, making your lip gloss look uneven.
4. Determine your best possible shades of gloss. You’ll want something that matches your skin tone, but you should also consider about other makeup you will be wearing. If you have several shades available, you should pick a best option and one or two backup colors.
5. Match your gloss with the occasion. If you’re trying to add some edge to your look, you might try using darker, sensual colors, like deep reds. A more innocent look might be achieved with lighter, gentler shades, like pinks and skin tones. Playful color, like oranges, blues, and metallic tones, might be perfect for a fun day out with friends.
6. Figure out what kind of lip gloss you’ll be using. There are three main ways of applying lip gloss, and you can determine the application with a quick look at the lip gloss you plan on using.
Today I tried wearing eyeshadow. It felt good but it was the wrong color. The color I got was old-ladyish and did not make my eyes pop the way I like. I will be wearing eyeshadow again just a different color.
If you want to know how to apply eyeshadow, here are some quick and easy steps:
The first step is to choose your eyeshadow. With entire stores designated just to eyeshadow options, choosing the right texture, hue, and brand can seem incredibly intimidating. Don’t allow the vast variety to scare you though – embrace it! The hundreds of options give you much flexibility in choosing the best eyeshadow for you. Shadows come in every color imaginable, and can be found in loose powder, compact powder, and cream forms.
The next step is to select the right brushes. Although you can indeed apply your eyeshadow using your fingertips, they will likely be too big and are coated in natural oils which make application difficult. Invest in a few good makeup brushes for the easiest and most attractive eyeshadow application. Avoid using sponge brushes for your eyeshadow, as these do not apply the pigment well at all.
The final step after that is to know how to apply your eyeshadow. One of the most important aspects of applying your eyeshadow is using the correct brush strokes and speed. Rushing through your makeup or using the wrong brush strokes will create a messy, unattractive eyeshadow application.
And that is how you apply eyeshadow.
http://www.wikihow.com/Apply-Eyeshadow

Today, I tried wearing blush as shown in the above picture. Unfortunately, my experiment did not go well at all. The brand of blush I got was way too red and made my skin itch and crawl so I had to wipe it off immediately. I have tried several kinds of makeup/blush products already and have not been able to find a blush product that suits me. I do not usually wear makeup so this is kind of difficult for me to test/find new products to use since I know basically nothing about makeup. I am learning what works and does not work for me while doing this experiment. So far, only the mascara has been a success. Hopefully the eyeliner and eyeshadow and other products that I am going to try will work and suit me better than the ones I have already tried out. Blush just was not the right fit for me. I do not need to wear makeup, but it does help boost my self esteem when I do put the time and effort into wearing it. I feel confident and even sexy when I wear makeup that suits me. That is the only reason why I continue to wear makeup sometimes.
If you want to know how apply blush, here are some quick and easy steps you can take. The first step is to choose your blush type. Powder and gel blushes are good for oily skin; cream is best for normal to dry skin. Whichever type you choose, its shade should match your natural coloring, so try to pick one that reflects your colour when you blush normally. The second step is to purchase some quality blush brushes. A blush brush is the best choice; never use a small, cheap brush. If you use a cheap brush, you’ll have a cheap looking result. Avoid makeshift items such as cotton wool balls or powder puffs as these do not work well with the pigment in the blush. Then your all set to apply your blush.
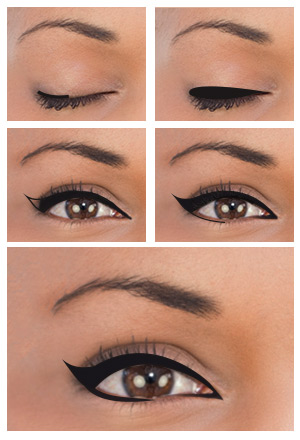
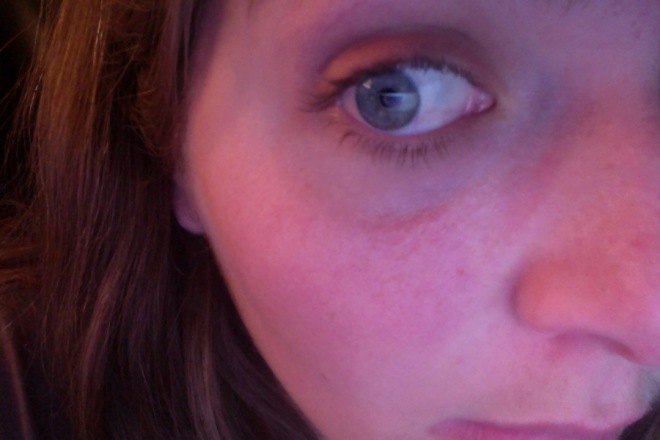
Yesterday, I tried wearing eyeliner like shown in the picture above. It was very difficult for me and I could not get the wing right and I kept accidentally poking myself in the eye! I do not think I will be wearing eyeliner again. It was a failed experiment, but now I know for the future to not wear eyeliner unless someone else does my makeup for me. Eyeliner is pretty cheap; it was only one dollar and 99 cents! Before this experiment, I expected makeup to be really expensive because of what my friends have told me when they went out to get makeup but it was exactly the opposite. I did not even attempt to put on liquid liner because I knew that would only end in a disasterous mess. Liquid eyeiner is a much more complicated process. The first step is the choose the kind of liquid liner you want to use. Then, you want to prepare your eyes but applying an eyelid primer. Next, you want to get in the right poistion. For example, get in front of a mirror or a hand mirror to better see what you are doing. After that, you want to draw a line of dots or dashes on your top eyelid. The next step is to connect the dots you just drew. You want to use a small, short, slow strokes to connect the dots or dashes you created. You will be able to create an even line on both eyes that lacks bumps or waves by following this method. Avoid connecting all the dots in a single stroke, but use several small strokes between each mark. The next step after that is to smooth out your line. If you find that the top of your line shows the breaks between the dashes, steady your hand and draw a thin line along the edge to smooth it out. Do so on the bottom edge of the liner as well to fill in any space between your eyeliner and your lash line. The next step is to add your tail. Regardless of the type of eyeliner that you use, a small tail should be created at the outer edge of your eyelid to give the illusion of a continuation of your lash line. Use your eyeliner to draw a small line extending upwards on your upper lash line, but drawn at the same angle as the upwards curve in your lower lash line. Draw a small triangle from the end of the line with the upper lash line and fill in the space. Finally, the last step is to finish your makeup. With the completion of your eyeliner, apply your mascara and any other finishing touches to your makeup. Use a large, full-bristled brush to wipe off any shadow or eyeliner that might have fallen underneath your eyes. Use a q-tip dipped in makeup remover to remove any mistakes you made in your eyeliner or mascara application.
